Want to build an event listing site? Your community would love it. Read this post and learn how to create a WordPress event directory.

Events are awesome. They bring like-minded people together. Events also play a vital role in skill development and knowledge sharing. To enjoy all this great stuff, first, we need to attend events.
But sometimes, some events go unnoticed by many of its potential participants.
The reason can be anything from lack of communication to a busy life. An event directory can solve this. The community members can simply visit that site and stay updated. This way, they will know when an event is planned.
Plus, such a WordPress directory with events can be a solid archive with records of past events.
Benefits of having a WordPress event directory
We know you’re already thinking about building an event directory. Let us boost that spirit by recalling some of the perks of having an event listing site.
- First, it’s a community service that would make you happy.
- A WordPress event directory can be monetized in several ways.
- You can make money by offering paid listing services.
- Provide event management and related aids via the site.
- Display ads to monetize the directory website.
The question is, how to build such an event listing site… Worry not, we’ll know it in this post. It will be an easy-to-follow tutorial.
What to expect from a WordPress event directory
Before starting the technical part, let’s briefly see what the visitors want from an event listing site.
- Event title
- Event description
- Event date and time
- Event website/relevant links
- Event location
- Organizer contact information
We’ll collect this information using multiple fields. Then our directory system will compile all of the information and render complete listing items.
Best tools to make a WordPress event directory
We’ll use WordPress as our web platform to create this event listing site. If you’ve used WordPress before, you may know about plugins. Yes, we’re talking about WordPress plugins. These are extensions to add functionalities to WordPress.
We’ll use a WordPress plugin to get the directory system on our site. Here are the ingredients for our WordPress event directory:
- A WordPress website
- Business Directory Plugin
You already know that we need a live WordPress site to get started. You can get a fresh WordPress site from our recommended WordPress hosting providers. Then, as the directory system, use Business Directory Plugin, the best WordPress directory plugin.

Business Directory Plugin can be used for free. You could launch a basic directory site with its free version. But, to make the site beautiful and feature-rich, we need a premium plan of the plugin. So, visit Business Directory Plugin's pricing page and choose a premium plan.
How to create a WordPress event directory
After getting the live WordPress site and Business Directory Plugin premium, let’s start building our event directory! It won't take you a long time. Also, it will be fun.
Step 1: Install Business Directory Plugin
This part is simple. Just install and activate Business Directory Plugin on your WordPress site. The plugin has several modules. We’ll install 2 of them right away- the Google Maps module and the Enhanced Categories module.
Google Maps Module will let us display the event locations on the directory. And, Enhanced Categories Module will offer a bunch of useful features including category image thumbnails.
Want to learn more about installing and managing modules? Please visit our module docs.
Step 2: Create event directory pages
Let’s create 2 directory pages- the listing front page and the listing submission page. Both of them are useful.
Listing front page: The listing front page will be used for displaying our directory categories and search tools. After activating Business Directory Plugin, we get a dashboard prompt to create this page with a button click.

Let's follow the prompt and create the directory front page. Once the page is built, we can find it from WordPress Dashboard → Pages. This page will be named “Business Directory” by default. We'll change that.

Event submission page: Basically, it's a front-end form to collect event submissions. We just need to enter the [businessdirectory-submit-listing] shortcode into a WordPress page to render this form.
Let’s go to WordPress Dashboard → Pages → Add New. Make a new page and enter that shortcode.
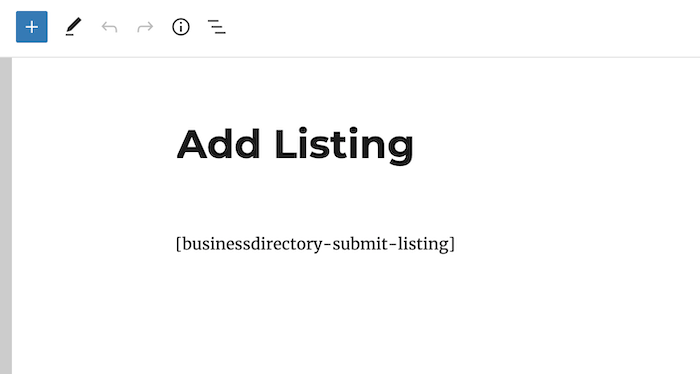
Publish the page.
We’ve got our necessary pages. You can set the listing front page as your site’s homepage if you want. Also, link the event submission page from anywhere to let your visitors submit events.
Step 3: Edit the form fields
The default Business Directory Plugin form fields are for common business listings. So we’ll edit them to match our purpose. Let’s have the following fields.
- Event Title
- Event Description
- Event Starting Date
- Event Ending Date
- Event Time
- Event Site
- Livestream Link
- Event Location
- Organizer Contact Info.

We hope these will be enough. But you can add more fields if you want.
Step 4: Add event categories
To keep the event listings organized, let’s add some categories. Business Directory Plugin has a custom category system called Event Categories for this.
Visit WordPress Dashboard → Directory → Directory Categories. Create, edit, and manage your event categories there.

You can add a category thumbnail image while editing any category. Use more Enhanced Categories options to enrich your event categories.
Step 5: Configure the plugin settings
It’s time to tweak the plugin settings. This will ensure that our directory system works the way we want.
Define a publishing policy: We’ll let our visitors submit event listings. But, before taking these submissions to live, we want to review them.
So, we’ll make sure that all new submissions and edits will be saved as drafts. Then an admin will review them and decide whether to publish or not.
Visit Directory → Settings → Listings to set this up.

Choose “Pending” for the default and edit post status options.
Set up pricing and payments: To offer paid listing features, we need to add pricing plans. Also, adding a payment method is required.
You can add new pricing plans by visiting Directory → Plans.

You’ll find a free plan built inside the plugin. It's a good place to start.

On the plan management page, you can add as many pricing plans as you need.
To add a payment method and accept payments, open Directory → Settings → Payment. Add your favorite payment gateway there. You have multiple options.
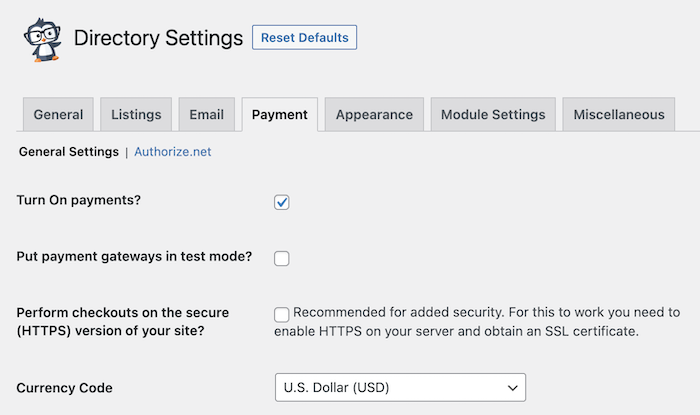
Visit our payment documentation and find every detail you may need to set up payments.
Step 6: Install a directory template
To make our event directory listings look beautiful and organized, we need to do some styling. No worries, you don’t have to code. Business Directory Plugin has directory templates for this.
These templates are multipurpose. You can use any of them on any type of directory (e.g. store directory, real estate directory, etc.). For this tutorial, we’ll use the template called “Restaurant”.
Again, don’t be confused with the name. Our directory templates are multipurpose. They have a modern design as well. You don't need a dedicated event directory theme.
Install the template from Directory → Themes.

Yes, you’ve read that right. Our directory templates are different from the main WordPress themes. Please read our theme documentation to learn more.
Step 7: Add event listing items
Now that our event directory website is ready to add event listings. Visit the Add Listing page that we've created earlier in this tutorial. Create listings with necessary information like event schedules, event ticket purchase link, etc.

For recurring events, you can use the same entry by updating the directory item. The event listing items are just custom post types of WordPress. You don't need to use any page builder to make or edit them.
Final result
After publishing some listing items, we can share our directory with our audience.
Here’s the directory front page view for you.

This is a screenshot of the directory item archive.

And finally, here’s the single listing detail view.

We hope you’ve liked it!
Learn More: How to Make a WordPress Product Directory
Wrapping up
Building an event listing site can sound difficult. But it becomes easy when you follow the right steps. We hope this tutorial will help you build your WordPress event directory. You may want to pair your directory with an events calendar plugin to offer more value.
Business Directory Plugin offers a 14-day money-back guarantee. Get Business Directory Plugin now and build your WordPress event directory with confidence!
Leave a Reply