Want to see how to use Font Awesome icons in your directory listings? We'll show you how to add them using our premium plugin!

When you create a business directory in WordPress, you'll need to use a professional and engaging design to show off your listings and increase conversions. However, one strategy you may not have thought about is adding Font Awesome icons.
When you add and customize your listing fields, you can also display their labels. Still, if you want a quick and easy way to boost the look of these elements, you can also add tiny images called icons. Not only can they make your pages look more attractive, but they can also help readers understand the field context.
In this post, we'll start by introducing you to Font Awesome icons and explain the benefits of using them in directory listings. Then we'll walk you through how to insert these icons into your business directory website with our premium plugin. Let's jump in!
An introduction to Font Awesome icons
Regardless of your type of website, it can help to vary your content to make the pages look engaging and scannable to your visitors. This process can sometimes feel difficult when you have a business directory site.
Apart from the logo images and standard text, you might feel that your information pages and forms look boring. However, you can breathe some life into them by using icons.
Our Business Directory Plugin now offers a feature that easily integrates with icon providers. Using our tool, you can add these pictures to your forms and listings with minimal effort.
In addition to Dashicons, our plugin now works with Font Awesome, a huge library of icons you can search, download and use for free:
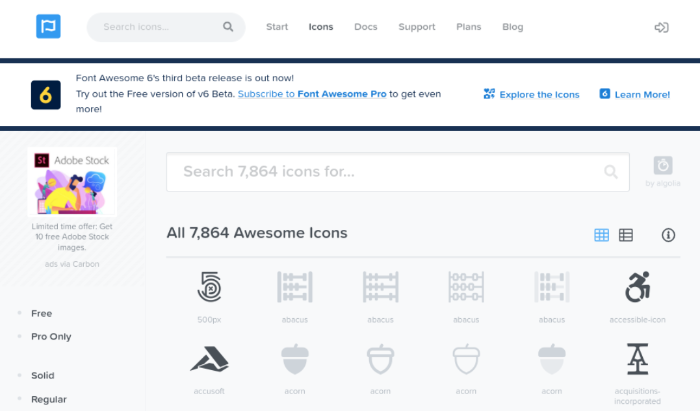
This platform lets you choose from thousands of icons to use across your site. It provides both free and premium versions. It also has plenty of filter options to make narrowing down your choices easier.
How to use Font Awesome icons in directory listings
If you haven't already, the first step is installing and activating our Business Directory Plugin. While there is a free version available, we recommend upgrading to a Premium plan so that you can access our Font Awesome icons feature.
If you don't currently have our tool or need some help, you can check out our Getting Started Guide. Once you have your directory up and running, you can use the following steps to add the Font Awesome icons to your listings.
Step 1: Install and activate the Font Awesome plugin
To get started, install and activate the Font Awesome plugin on your WordPress site. This free tool will enable you to insert the Font Awesome icons directly into your business directory listings:

You can add the tool by going to Plugins → Add New from your WordPress admin area, then searching for “Font Awesome”. Next, click on the Install Now and Activate Plugin buttons in that order.
Step 2: Go to a directory listing field
The next step is to go to the form field where you want to insert an icon. You can follow this step for existing form fields or use it when making a new one.
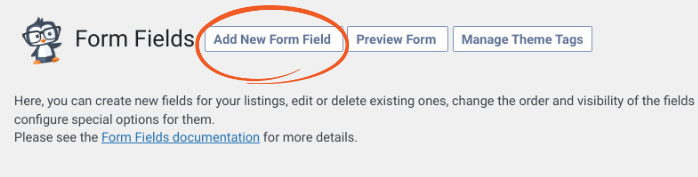
To create a new form field, go to Directory →Form Fields → Add New Form Field:
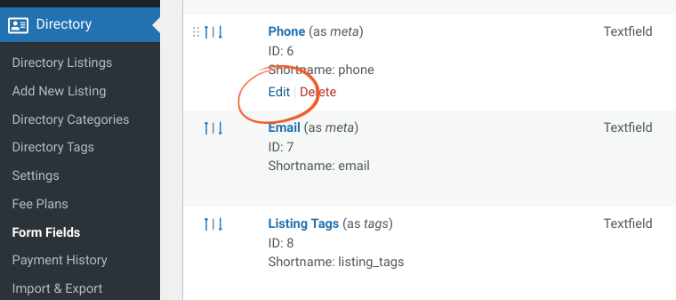
Alternatively, to update an existing one, select the Edit link under the form field name from the list:
Once you're on the Form Field screen, scroll down to the Field display options. There will be a Display label and/or icon setting and an option to Replace value with icon:
You can switch this to an option that shows the icon rather than the text. In addition to hiding the label, you can select either Show Icon or Show Label and Icon. We'll choose the second one in this tutorial.
Step 3: Select your icons
Once you choose the icon setting, the next step is to select the icon you want to use. A new option will appear called Field Icon:
By default, the plugin includes Dashicons that you can use. If you have the Font Awesome plugin installed, you can also pick from its icons:
You can scroll through the icon options or look for one with a specific term. When you find one that fits your needs, click on it to insert it.
Step 4: Save and preview your changes
After you've added the icon you want to display, click on the Update Field button at the bottom of the screen to save your changes. You can repeat this step for as many form fields as you want.
Next, we recommend seeing how these icons look on the front end of your directory website. To do so, head to any of your directory listings that use these form fields. Then, select Preview:
If everything looks as it should, you're all set!
Conclusion
Finding new ways to make your business directory listings look good can be hard. However, when you use our Business Directory Plugin, you can easily add icons next to your field text. They can help make your pages and forms more attractive and engaging for your users.
As we discussed in this post, you can add Font Awesome icons to directory listings in four simple steps:
- Install and activate the Font Awesome plugin.
- Go to the listing field where you want to add an icon.
- Choose to display an icon and pick one from the library.
- Save and preview your changes.
Are you ready to start adding Font Awesome icons to your directory listings? Download Business Directory Plugin today to get started!
Leave a Reply