Want to earn money from your listing website? Looking to build a WordPress paid business directory? Here's the easiest way for you.

Wondering how to monetize an online directory? A WordPress paid business directory is a great way to do this. It helps visitors find useful information. Also, it can be a good source of revenue from paid listings.
Now that, you’re willing to start a paid business directory site. Without proper tools and procedures, this would be impossible to accomplish. But you’re lucky because we’re here to help!
In this tutorial, we’ll show you how to make a WordPress paid business directory. We hope you’ll find this post useful. Let’s jump right in!
Best tools to create a WordPress paid business directory
We need only a few things to create a paid listing site. Here’s the list for you.
- A WordPress website
- Business Directory Plugin
- Your payment gateway account
Business Directory Plugin is the best free WordPress directory plugin. It has an amazing 4.7-star rating and 20K+ active installations in the WordPress plugin repository. The best part is, this plugin offers several premium plans to boost your directory.
How to create a paid listing site in WordPress
The very first thing we want to have is a live WordPress website. If you want to set up the directory on your existing site, then please move to the next step. In case you want to get a fresh new site for the directory, you have several options.
You can build a new WordPress site using your domain registrar’s unified dashboard. Also, there are many web hosting services where you can build a fresh WordPress site quickly. Just contact them, and you’ll get your fresh WordPress site soon.
Got your WordPress site live? Great. Several drag-and-drop page builders are available for WordPress. Managing this site won't be difficult for you.
And yes, now we’re ready to start the key procedures. Here we go!
Step 1: Install and activate Business Directory Plugin
The magic starts with our Business Directory Plugin. You can turn a WordPress site into an online directory with this plugin in minutes.
Installing a WordPress plugin is simple. Find the details in our documentation on how to install Business Directory Plugin.
The free version can be used to create a WordPress paid business directory. But the features would be limited. You get only one payment method support (Authorize.net) in the free version.
Get a premium version of Business Directory Plugin to accept payments using PayPal, Stripe, and more. Since you’re building a money-making directory, so we would suggest you get a suitable premium plan for the plugin.
We hope you’ve installed and activated Business Directory Plugin on your site. The plugin adds a WordPress dashboard menu called “Directory” on the left menu bar. Visit that to find all options the plugin offers. Now let’s go to the next step.
Step 2: Create directory related pages
Directory Listing Page: Business Directory Plugin takes care of everything you need in your listing site. When you activate the plugin, it gives an option to create the core directory listing page with a click.
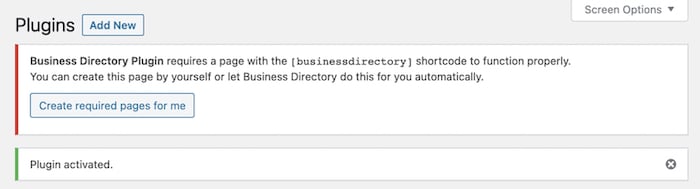
As you can see in the above screenshot, clicking the “Create required pages for me” button will create a listing page. The title of this page will be “Business Directory”.

You can find it by going to the WordPress Dashboard → Pages.
That's not all! You can create custom listing pages with conditions using Business Directory Plugin shortcodes.
Listing Submission Page: Business Directory Plugin lets you add listing items from 2 ends. Back-end and front-end. To get the back-end listing creation option, visit Directory → Add New Listing.
However, the back-end interface is only for internal users. On this directory, you’ll want to accept listing submissions from your visitors as well. This is why we need a dedicated submission page on the front-end. Let’s create that!
Go to your WordPress Dashboard → Pages. Create a new page and put the [businessdirectory-submit-listing] shortcode inside it. Publish the page.

You can link to this page from anywhere so that visitors can submit new listings using the form.
If you want to manage the form fields and add custom fields, go to Directory → Form Fields. This will enable your visitors to add more versatile business listings.
Step 3: Configure Business Directory Plugin settings
Business Directory Plugin has a large set of configuration options. You can access them from Directory → Settings. The behavior of your WordPress paid directory depends on how you set it here.

Let’s discuss some of the settings options right away.
General: This tab allows you to configure the directory-specific URLs. Here you can decide whether a user can submit a listing without logging in. Other options include reCAPTCHA and AJAX submission form controls.
Listings: Use this section to set up listing expiration time, renewal option, number of listings per page, etc. Our WordPress paid business directory plugin lets you provide a contact form on the listing detail pages. You can set it up here. Also, there are search settings, button settings, etc.
Email: You can display relevant email addresses on the listing items. Customizable notification emails are also available. Do all the email tweaks you need using this tab.
Appearance: Customize the listing related button colors as you like. Here you can also define the listing image uploading policy, thumbnails, etc.
Payment: It's one of the most important sections for this tutorial. Use this tab to set up the payments. We’ll discuss it in more detail later.
Step 4: Create WordPress paid business directory pricing plans
You can create several pricing options for the businesses interested in your directory. You can offer free and paid listing options at the same time. Complete flexibility!
Visit Directory → Plans → Add New Plan to create a pricing plan for your business directory.

Add a plan label. This will be the pricing plan’s title. The Plan Description field will tell what the plan is for.
Set the time limit for how long the listing will run. Also, you can define the allowed number of images for the listing items.
If you want to charge on a recurring basis, here’s an option for that too. And finally, choose the pricing structure and amount.
Once the pricing options are defined, click the Add Plan button below. This will create your new plan. Go to Directory → Plans to view and manage your directory pricing plans.
If you don’t have an active payment method on the directory, the paid plans will be disabled. Please see our documentation about how to use plans to learn everything about pricing plans.
Step 5: Turn on payments
After adding the plans, we need to set up the payment system. This can be done from Directory → Settings → Payment.
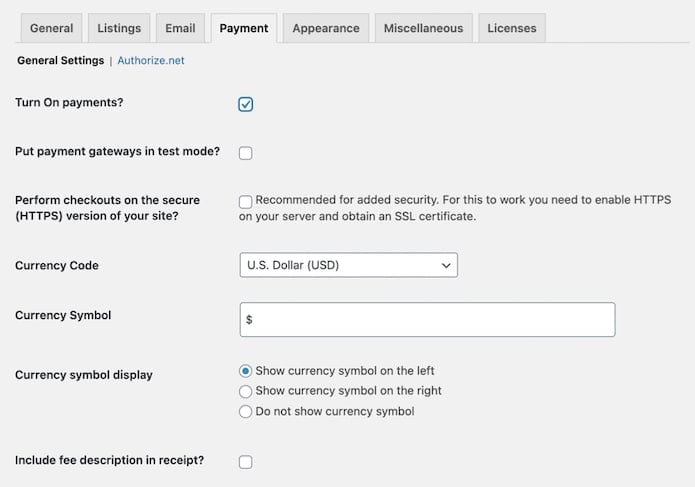
On this page, you’ll see the payment collection service sections. There are several supported gateways like PayPal, Stripe, Authorize.net, etc.
The Business Directory Plugin free version offers built-in support for Authorize.net. If you need other payment options, please get a premium plan accordingly.
To go with Authorize.net, click on that in the Payment tab. Connect Authorize.net to the plugin using your credentials.
It’s recommended to set the payment method in “test” mode for some time. This will allow you to check whether the payment system is working properly. Once done, you can disable the “test” mode, and enter into production mode.
Once you get your payment method connected to the site, you can get your paid plans active. To check whether you got the correct plans active, go to Directory → Plans.
Business Directory Plugin has detailed documentation on how to set up the payments. Don’t forget to go through that!
Once you get the payment system active (in production), the plans working, your visitors will be able to submit paid listing items. You can charge them one time or on a recurring basis.
Also, check whether the email notifications are working. It's a vital part of your paid business directory. If you face any issue with emails, check out our post on how to fix WordPress email problems.
So, congratulations! You’ve just built your paid WordPress business directory. But wait, this is just the beginning!
Take your WordPress paid business directory to the next level
Of course, you can create a WordPress paid business directory with the free version of our Business Directory Plugin. You’ll really love what it can do with a premium plan. You can always upgrade to one of our paid plans.
Let’s see some premium features of Business Directory Plugin.
- Premium Templates: Present your directory items more professionally with our exclusive premium directory themes.
- Featured Listings: Display particular listing items on the top of the list. You can offer multi-level paid featured listings highlighted with a different color.
- File Uploads: Give your customers the ability to upload attachments with their listing items.
- Ratings and Reviews: Your visitors can add their reviews and ratings for listing items.
- Category Images: Make your listing categories more appealing by adding thumb images to them.
- ABC Filtering: Enable your visitors to find listing items based on the first letter of the item names.
- Backup & Migration: Create backups of your site and migrate easily if needed.
- Google Maps: Take location-based listings to a whole new level with the power of Google Maps.
- Discount Codes: Offer discounts to your customers using functional coupon codes.
- Limit Features by Pricing: Charge the customers to access some additional form fields.
- Claim Listings: You can create the listings and make them available for the visitors to claim.
- Advanced Payment Gateways: More payment gateways mean more freedom. Use PayPal, Stripe, and more in the applicable premium plans.
We believe you’ve got enough reasons to get Business Directory Plugin premium. Just visit our pricing page and choose the plan you like!
You can create all types of directories like a staff directory, local business directory, and more with our plugin. Multiple directories in a single site is also possible.
All of our plans are risk-free. You’ll get a 100% refund if you don’t like the plugin. There’s a 14-day money-back guarantee. No questions asked!
Wrapping up
As promised, we’ve shown you how to create a paid business directory on WordPress. Hopefully, you’ve enjoyed this journey. You’re now ready to start your own WordPress directory site and earn money from paid listings.
Don’t miss out! What are you waiting for? Get Business Directory Plugin now and launch your shiny new WordPress paid business directory today!
 How to Reduce Customer Churn (3 Key Tips)
 How to Monetize a Directory Website (3 Key Tips)
 How to Make Money with a Business Directory Website
Leave a Reply