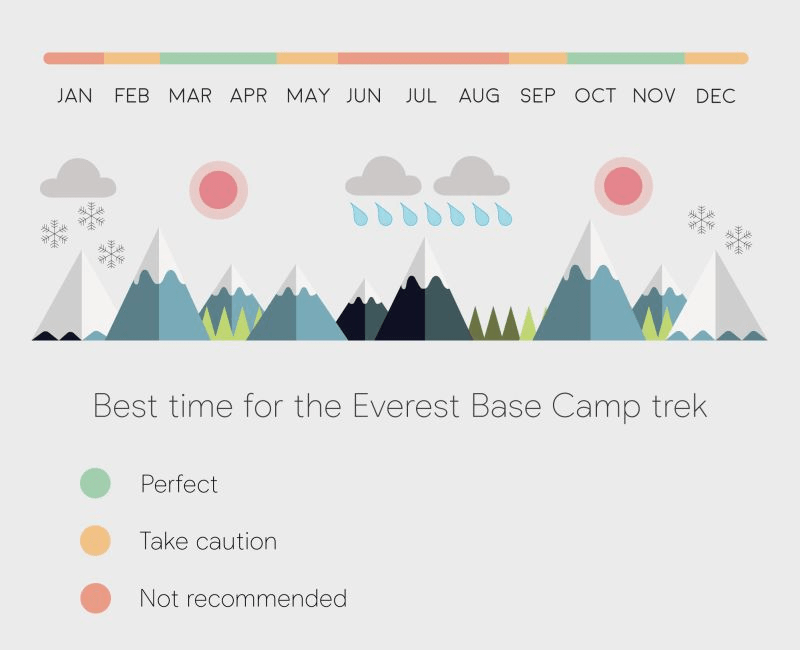
The Best time to trek Everest Base Camp trek is generally considered to be from March to May and from mid-September to November. During these seasons, trekkers can avoid the extreme snowfall of winter and the heavy monsoon rains of summer. Let’s discuss the advantages and disadvantages of each season:
March to May (Spring):
Pros:
- Moderate temperatures: The weather begins to warm up, with temperatures ranging from mild to moderately cold at higher altitudes. Days are generally pleasant for trekking.
- Beautiful scenery: The spring brings colorful blooms and vibrant rhododendron forests, adding an enchanting touch to the landscapes along the trekking route.
- Longer daylight hours: Spring offers longer days, providing more time for trekking and exploration.
- Festive atmosphere: This season coincides with several Nepalese festivals, allowing trekkers to witness and partake in cultural celebrations.
Cons:
- Crowded trails: Spring is a popular time for trekkers, and the trails can be crowded, especially during peak times. Accommodation and facilities may be in high demand.
- Occasional cloud cover: Clouds can obstruct views of the mountains, especially during late spring. However, the weather is generally clear in the early part of the season.
Highlights
- Wildlife sightings: Spring is a good time for spotting wildlife along the trekking route, as animals become more active after the winter season.
- Tea houses and lodges: During spring, tea houses and lodges along the trail are fully operational, providing a wide range of accommodation options and dining facilities.
- Melting snow: While the snow starts to melt during spring, there may still be patches of snow at higher elevations, requiring cautious trekking and potentially the use of crampons or other equipment.
- Pre-monsoon showers: Towards the end of the spring season, occasional rainfall and pre-monsoon showers may occur. However, these are generally not as heavy as the monsoon rains.

Mid-September to November (Autumn):
Pros:
- Stable weather conditions: Autumn offers stable and clear weather, making it easier to enjoy uninterrupted views of the majestic Himalayan peaks.
- Mild temperatures: The temperatures are comfortable during the day, with cool evenings. It is generally drier than other seasons, providing excellent trekking conditions.
- Less crowded: Compared to the spring season, autumn sees fewer trekkers, allowing for a more peaceful and secluded experience on the trails.
- Panoramic views: The skies are often clear, offering panoramic vistas of the mountains, including Mount Everest.
Cons:
- Cooling temperatures: As the season progresses, temperatures start dropping, and it can get quite chilly, especially at higher altitudes. Proper cold-weather gear is necessary.
- Shorter daylight hours: The days become shorter as autumn progresses, reducing the available trekking time.
- Higher altitude risks: Although autumn is generally considered a safe time for trekking, the higher altitudes can still pose challenges and risks, including altitude sickness.
Highlights
- Clear mountain views: Autumn is renowned for its crystal-clear skies, offering breathtaking views of the surrounding peaks, including Mount Everest and other iconic mountains.
- Mild temperatures: The temperatures in autumn are generally pleasant, making trekking comfortable during the day. However, nights can still be cold, especially at higher altitudes.
- Cultural encounters: Autumn is when many local festivals take place, providing an opportunity to experience the region’s rich cultural heritage and interact with the local communities.
- Limited availability of accommodation: While autumn sees fewer trekkers compared to spring, popular lodges, and tea houses along the route can still fill up quickly, so it’s advisable to make advance bookings.

Both seasons have their own unique appeal, and the choice ultimately depends on personal preferences, fitness levels, and availability. It’s recommended to consult with experienced trekking agencies or guides to determine the best season for your Everest Base Camp trek based on your specific requirements and preferences.
It’s important to note that weather patterns can vary, and unexpected conditions can occur at any time. It’s advisable to check the weather forecast and consult with experienced guides before embarking on an EBC trek, regardless of the season chosen.
When to trek Everest Base Camp
Selecting the optimal time for embarking on the Everest Base Camp trek entails taking into account two key factors: weather conditions and crowd levels. Throughout the year, the weather conditions along the trail undergo significant variations, as do the volume of trekkers on the EBC route. By carefully considering both aspects, you can make an informed decision and choose a time of year that aligns with your personal preferences.
Let’s begin by examining the weather conditions, followed by a discussion on how the number of trekkers impacts the EBC route.
Weather Conditions Along the Everest Base Camp Route
The Base Camp trek covers a distance of approximately 65 km, taking you through varying climate zones and elevations. As you embark on this journey, you’ll witness a remarkable transition in weather conditions, starting from a temperate climate in the low Himalayas and culminating in a cold tundra climate in the high Himalayas. This vast area encompasses diverse climate zones that shape the weather along the trek.
The route can be divided into two distinct climate zones:
Temperate Climate (First Half of the Route):
The initial portion of the trek, passing through the low Himalayas, is characterized by a temperate climate. Starting from the town of Lukla, situated at an elevation of 2,860 m above sea level, you’ll encounter mild temperatures and a pleasant environment as you ascend.
Cold Tundra Climate (Second Half of the Route):
As you continue further along the route, you’ll enter the high Himalayas, where a cold tundra climate prevails. Reaching the endpoint of Base Camp, located at an elevation of 5,364 m above sea level, you’ll experience significantly colder temperatures and a mountainous climate.
To gain a better understanding of the elevation changes throughout the trek, refer to the cross-section map below, which illustrates the circular route commonly followed by groups undertaking the Everest trek. This visual representation showcases the dramatic shifts in altitude, from the starting point in Lukla to the final destination.
Varied Weather on the Everest Base Camp Trek
The EBC trek encompasses a wide range of weather conditions, making it essential to consider four key elements when researching the weather along the trail: rainfall, temperatures, winds, and snowfall. Let’s delve into each of these elements in detail:
Rainfall:
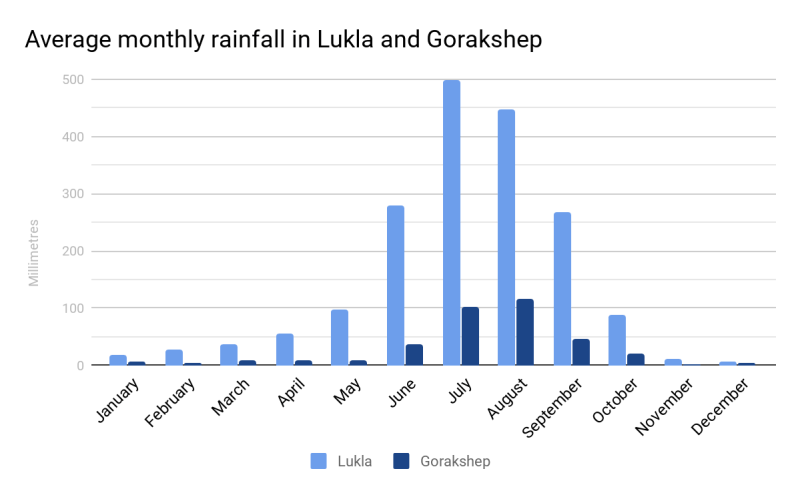
Rainfall patterns play a crucial role in determining the weather along the Everest trail. It’s important to note that the region experiences distinct wet and dry seasons. During the wet season, typically from June to September, the trail receives a higher amount of rainfall. As a result, trekkers should be prepared for wet and muddy conditions, with occasional showers and increased levels of precipitation.
Contrasting Rainfall in Lukla and Gorakshep
To highlight the significant disparity in rainfall levels between Lukla, the starting point of the Everest trek route, and Gorakshep, the final destination, we have compiled the following graph using data from climate-data.org.

The graph demonstrates the substantial contrast in rainfall patterns experienced in these two locations along the trek. Lukla, situated at a lower altitude, typically receives a higher amount of rainfall throughout the year. This is primarily due to its location in a temperate climate zone, where precipitation is more frequent. In contrast, Gorakshep, located at a higher elevation closer to the Everest Base Camp, generally experiences significantly lower levels of rainfall.
Understanding these distinct rainfall patterns is crucial when planning your trek. It’s important to be prepared for potentially wetter conditions in Lukla and more moderate or drier conditions as you progress toward Gorakshep. Proper rain gear and waterproof equipment are recommended, especially during the wetter months, to ensure a comfortable and enjoyable trekking experience.
Remember to consult up-to-date weather forecasts and local authorities for accurate and detailed information on rainfall and weather conditions along the route.
Temperatures:
Temperature variations are significant along the Everest Base Camp trek due to the diverse climate zones encountered. In the temperate zone of the low Himalayas, temperatures are generally milder, ranging from cool to warm depending on the season.
Temperature Contrasts in Lukla and Gorakshep
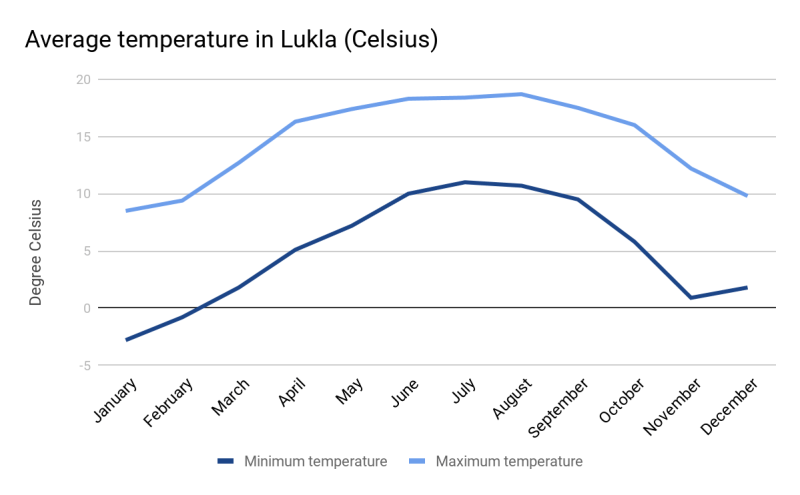
As the starting point of the Everest trek, the mountainside town of Lukla experiences relatively pleasant temperatures throughout the year. Situated at an elevation of 2,680 m above sea level and located in Nepal’s temperate climate zone, Lukla offers favorable conditions for trekkers. The following Celsius and Fahrenheit graphs illustrate the average monthly temperatures in Lukla, highlighting the mild climate:

The temperatures in Lukla remain comfortable, with only slight variations throughout the year. Even during winter, the night-time temperatures hover just below freezing point, ensuring relatively mild conditions for trekkers.
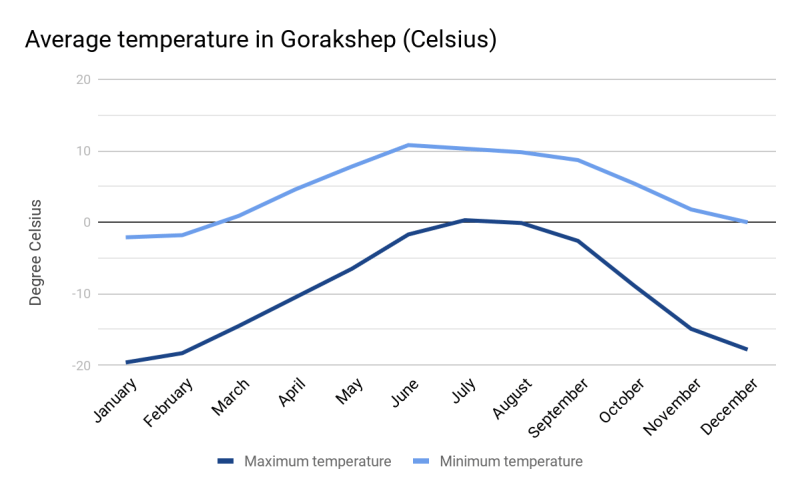
In stark contrast, Gorakshep, the highest village on the Everest Base Camp trek located at an elevation of 5,164 m, presents a completely different temperature scenario. This village serves as the final overnight stop before heading back toward Lukla. The following Celsius and Fahrenheit graphs provide an overview of the average monthly temperatures in Gorakshep:

The temperatures in Gorakshep reflect the challenging and harsh conditions encountered at higher altitudes. With significantly lower temperatures compared to Lukla, trekkers should be prepared for cold and sub-freezing conditions in Gorakshep, especially during the winter months.
Understanding these temperature variations is vital for proper packing and preparation. It is recommended to bring appropriate layers of clothing, insulation, and cold-weather gear to withstand the colder temperatures experienced in Gorakshep. Additionally, consulting local weather forecasts and guidance from experienced guides is essential to ensure a safe and comfortable trekking experience in changing temperature conditions along the route.
Winds:
Winds are another important aspect to consider when assessing the weather along the Everest Base Camp trail. The region experiences strong winds, particularly in the higher elevations. It’s essential to be prepared for gusty conditions, especially in exposed areas and mountain passes. Proper windproof clothing and gear are recommended to withstand the windy conditions encountered during the trek.
Snowfall:
Snowfall is a significant factor in the weather conditions along the EBC trail, especially during the winter months. From November to February, the region experiences heavy snowfall, particularly in the higher altitudes. Trekkers should be aware that snow-covered paths can be more challenging to navigate, requiring additional precautions and appropriate gear such as trekking poles and crampons. It’s crucial to stay updated on weather forecasts and consult with experienced guides or local authorities to ensure safe trekking during periods of snowfall.
Considering these four elements—rainfall, temperatures, winds, and snowfall—will provide a comprehensive understanding of the weather conditions along the trail. Being well-informed and adequately prepared for these weather variations will contribute to a safer and more enjoyable trekking experience.
Optimal Months for Trekking Everest Base Camp
Based on the considerations of rainfall, temperature, winds, and snowfall, the two peak seasons for trekking the Mount Everest routes are late March to mid-May and late September to November. Let’s explore the advantages and drawbacks of each season:
March to May Trekking Season:
The period from March to May offers several advantages for trekkers. The visibility during this season is typically excellent, providing clear views of the breathtaking mountain scenery. There are also more sunny days, enhancing the overall trekking experience. Additionally, this season showcases vibrant spring flower displays, with rhododendrons adding splashes of red and pink to the landscape. April and May are particularly lively at Base Camp, as it becomes fully operational, offering a unique opportunity to witness the bustling activity. However, it’s important to note that late April and May may experience heat haze and increased cloud cover, potentially obscuring the mountain peaks.
September to November Trekking Season:
Late September to November is another favored season for trekking to the Everest. During this time, the daytime temperatures are pleasant, creating comfortable trekking conditions. Late October and November, in particular, are preferred by many trekkers due to stable weather patterns and excellent visibility. Although it can be colder during these months, the trade-off is the clear skies and far-reaching views, allowing trekkers to immerse themselves in the awe-inspiring mountain vistas.
Ultimately, the choice of the best time to trek Everest Base Camp depends on personal preferences and priorities. Both seasons offer unique advantages and drawbacks, so it’s important to consider factors such as weather preferences, desired visibility, and the overall trekking experience when making your decision.

Peak Seasons for EBC Trek
The Everest Base Camp trek has gained significant popularity in recent years, leading to increased crowd levels during peak seasons. It is estimated that approximately 30,000 to 40,000 individuals undertake the trek to Everest annually. During peak seasons, the number of people embarking on the trek can reach as high as 500 individuals per day.
These peak seasons, which attract a large number of trekkers, occur during the following periods:
Late March to mid-May:
This season, encompassing the spring months is a popular time for EBC trekking. The favorable weather conditions, including good visibility and a higher number of sunny days, make it an appealing choice for many. However, it’s important to note that the popularity of this season can result in increased crowd levels along the trekking route.
Late September to November:
The period from late September to November is another peak season for the trek. During this time, trekkers can enjoy pleasant daytime temperatures and generally stable weather conditions. The clear skies and excellent visibility make it a preferred choice for those seeking panoramic views of the Himalayan landscape. However, like the spring season, the popularity of this period can lead to higher levels of trekker traffic.
When planning your Everest Base Camp trek, it’s advisable to consider these peak seasons and their associated crowd levels. If you prefer a quieter and less crowded experience, you may opt for alternative months outside of these peak seasons. Additionally, consulting with experienced guides or local authorities can provide valuable insights and recommendations to ensure an enjoyable and well-managed trekking experience.
Ready to embark on your Everest Base Camp adventure? Consider the factors discussed above to determine the best time for your trek. Whether you prefer the clear skies and spring blooms of late March to mid-May or the stable weather and breathtaking views of late September to November, both seasons have their unique allure. Keep in mind the potential for higher crowd levels during these peak seasons, with as many as 30,000 to 40,000 trekkers making their way to Base Camp each year.
Plan your journey wisely and consult reliable sources for up-to-date weather forecasts and guidance. Remember, the choice of the best time to trek Everest Base Camp depends on your preferences and priorities. Get ready to experience the beauty and challenge of this iconic trek, and make unforgettable memories in the awe-inspiring Himalayas!
Discover more from Nepal Travel Vibes
Subscribe to get the latest posts sent to your email.


